

How to make the most delicious cut-out Christmas cookies
By Genevieve Ko
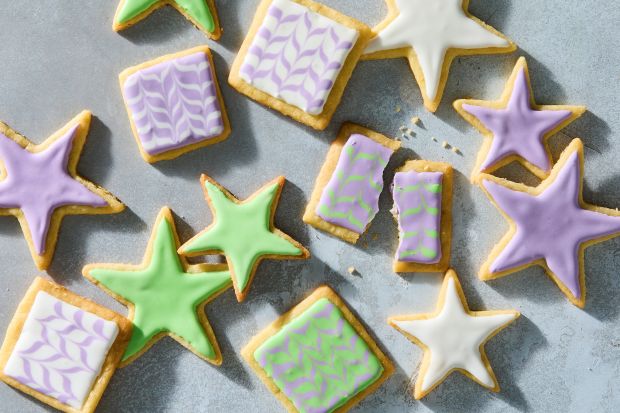
The taste of nostalgia matters, all the more so around the holidays. Maybe the floury mildness of sugar cookie cutouts, pasty under hard icing, is important to you. If so, enjoy! If, however, you want a buttery, snappy shortbread with the floral sparkle of orange zest that is then glossed with a refreshingly zingy lemon glaze, bake these.
I would be lying if I said rolling and cutting out shortbread is effortless. But below, you’ll find ways to make the process less intimidating and more foolproof to turn out flawless cookies that taste like sunshine, as well as smart tips that make cutting and decorating cookies easier, no matter what recipe you use.
Gather Your Tools
Fancy decorated cookies often call for fancy tools, starting with a stand mixer and ending with piping tips. But, regardless of the recipe, you can usually make some smart substitutions:
— If you don’t have a stand mixer or a hand-held electric mixer, mix the dough by hand. This shortbread may even be better that way (more on that later).
— A wine or other glass bottle can step in for a rolling pin.
— No cookie sheet? A half-sheet pan works well. If you don’t have one, get one. You’ll use it for everything in the kitchen.
— If you don’t have cookie cutters, these shortbread cookies can be made as slice-and-bake rounds, squares or rectangles.
— Resealable plastic bags are great substitutes for piping bags. Either way, you don’t need piping tips to decorate.
The Roles of Three Key Ingredients
When it comes to cutting out festive stars and stockings, sugar cookie dough has long been the favourite, but shortbread is far more delicious. Understanding these cookies’ three primary ingredients can help you choose which one to bake. The difference is a matter of proportion: Sugar cookies have a higher ratio of flour and sugar, which makes them sturdier and more like clay for rolling and cutting. But it comes at the cost of flavour. Shortbread highlights the milky allure of butter in its not-too-sweet dough. To end up with ideal shortbread tastes and textures, follow these tips:
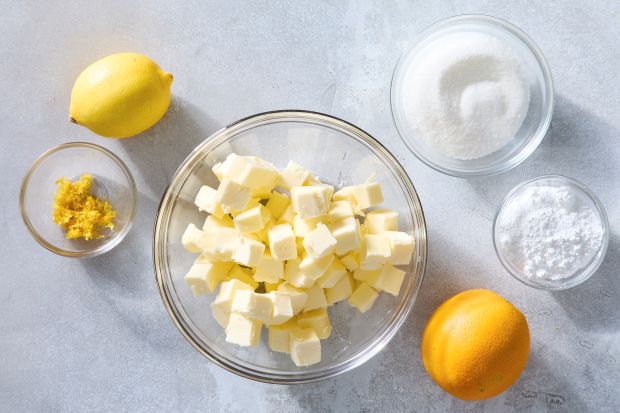
— BUTTER: For these tender-crisp shortbread, make sure your butter is at cool room temperature. Cold, hard butter won’t blend easily, and over-softened butter can cause finished cookies to feel greasy, spread too thin or bubble on top. The butter is ready when you press it and can leave a finger imprint with a little resistance. To get your butter to temperature, cut a cold stick into half-inch cubes and then let sit at room temperature while you gather and measure the other ingredients.
— SUGAR: Using two kinds of sugar — granulated and powdered — makes shortbread crunchy and tender. White granulated sugar not only sweetens, it also provides a light snap because it helps create air pockets in butter when the two are beaten together, while powdered sugar lends a melt-in-your-mouth crumble. Here, only a small proportion of powdered sugar is used because the shortbread still needs structure to hold up to decorating.
— SEASONING: At its most basic, shortbread requires only flour, butter and sugar, but seasoning lends depth to the final cookies. Salt — in butter or granules — does heavy lifting, as does vanilla. This recipe goes one step further, giving vanilla shortbread extra zip by gently rubbing orange zest into the granulated sugar. Be sure to grate only the outermost layer of peel to avoid any bitterness from the pith, and run the orange against the zester in short strokes to keep the bits fine.
Don’t Overmix the Dough
Of course, you can use a stand mixer or electric beaters, but using a spatula or wooden spoon prevents overbeating. Too much air in the dough can cause it to puff in the oven and then collapse when cooling, and the vigour of an electric beater can make the cookies tough after the flour is added.
If you prefer the mixer, be sure to avoid high speed and stop mixing as soon as the dough comes together.
Chill the Dough as a Thin Slab
You can’t roll shortbread dough right after mixing. It’s too sticky, so recipes typically call for patting the dough into a 1-inch-thick disk before refrigerating it for up to a few days before rolling. But chilling until the dough is hard can make it difficult to roll and easy to crack.
To avoid this, shape the dough into a 1/2-inch-thick block and chill only until it loses its stickiness but isn’t yet firm. (When you press it, you should be able to leave a fingerprint with a little resistance.) This makes it far easier to roll into a thin, even sheet. Even a wine bottle will be able to glide over it.
Use Floured Parchment Paper
The neatest way to roll any dough is by placing it on floured parchment and then covering it with a dusting of flour and, if you’d like, plastic wrap or another sheet of parchment. This keeps your counter clean and guarantees the dough won’t stick to it. Simply flip the dough every once in a while, and, if using, lift the top sheet of plastic or parchment off each time to keep the dough smooth. Once rolled, those thin sheets of dough need to be chilled until hard before cutting into shapes and can be covered and refrigerated for days.
Cutting the dough on that floured parchment ensures any shapes will come right off. If they don’t, they can be peeled off like stickers.
Smashing the scraps of dough into a ball and rerolling will make them tough. Instead, jigsaw the pieces together and roll gently just to smooth them out. Or bake bigger scraps as they are and enjoy them as snacks.
Choose Your Preferred Texture
The beauty of shortbread is that you can bake it as you like. I prefer rolling the dough thin and letting it get quite brown at the edges and golden brown across the top for a complex caramelized toastiness and snappy crunch. If you like soft, golden cookies, roll the dough thicker and pull the shapes out of the oven earlier.
If you have the space and enough pans, cool the cookies completely on the baking sheets and then decorate on the pan. This saves you from extra dishwashing and wasting parchment.
Make the Icing Thicker to Start
When mixing icing, add just enough liquid (lemon juice, in this recipe) to powdered sugar to make a paste. (It’s easier to stir in a few more drops of liquid to thin a smooth icing than it is to stir in more clumpy sugar to try and thicken it.) Icing that’s thick enough to pipe clear lines and set firmly should stay opaque and run slowly off a spoon when lifted.
Tint Gradually
Tinting your icing is optional, but for the most vibrant hues, use gel paste food colouring and add a tiny dot at a time. As with mixing the icing, it’s always easier to deepen the colour than it is to lighten it.
If you prefer more natural options, consider adding turmeric for gold, butterfly pea powder for lavender, matcha for mint green or a red juice, such as cranberry, pomegranate or sieved fresh raspberries, for pink.
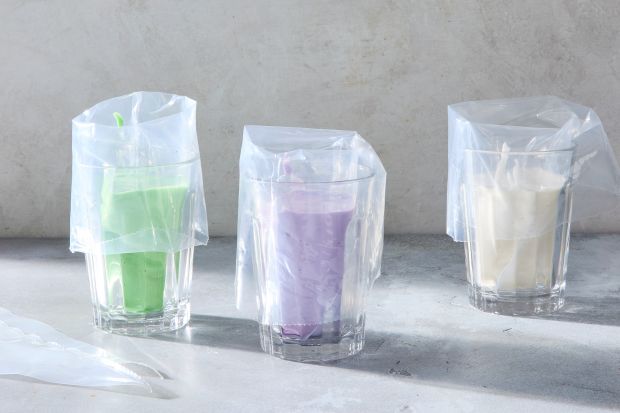
Fill Piping Bags Without a Mess
As a general rule, it’s easiest to pipe from smaller piping bags that aren’t filled with too much icing, so you can grip the bag with your whole hand. To transfer the icing into a piping bag without making a sticky mess, open the bag, slide it into a cup and fold the top of the bag over the cup’s rim. This keeps the bag upright and prevents icing from spilling onto the outside of the bag.
Start Small and Practice on Scraps
If not using a piping tip, snip the smallest possible opening from the piping bag and then draw a line on parchment or a cookie scrap to see if you like that thickness. Keep snipping it wider until you reach the diameter you prefer. Either way, keep the wide ends of the bags tied shut, and slide the bags into the cups, tips side up when they’re not in use.
With these basic steps, rolling and cutting shortbread dough into shapes will turn out the tastiest cookies — and maybe even evolve into a new holiday tradition.
—
RECIPE:
Holiday Citrus Shortbread
By Genevieve Ko
Buttery and snappy with the floral sparkle of orange zest, these shortbreads get an extra zing from a glossy lemon glaze. These holiday cookies — delicious any time of year — highlight the milky allure of butter in their not-too-sweet dough and come out tender if rolled thick and crisp if thin. For an extra-toasty depth, leave the cookies in the oven until they burnish to a deep brown. The tangy zip of these cookies, whether cut into decorative shapes or simply sliced into rounds or squares, glazed or not, is the perfect counterpoint to the season’s sugar excess.
Yield: About 72 (2-inch) cookies
Total time: 2 hours 45 minutes, plus 1 1/4 hours’ chilling
Ingredients:
For the cookies:
1/3 cup/70 grams granulated sugar
1/2 teaspoon fine salt
1 orange
3 tablespoons powdered sugar
1 cup/228 grams unsalted butter, cut into small cubes, at cool room temperature
1 teaspoon vanilla extract
2 cups/260 grams all-purpose flour, plus more for rolling
For the icing:
2 cups/230 grams powdered sugar
Pinch of fine salt
2 to 4 tablespoons fresh lemon juice
Food colouring (optional)
Preparation:
1. Make the cookies: Mix the granulated sugar and fine salt in a large bowl. Zest the orange directly over the mixture, then gently rub in the zest using your fingertips until slightly moist. Add the powdered sugar and butter, and use a wooden spoon or spatula to mash together until the sugars are incorporated, then mix until evenly orange and creamy.
2. Add the vanilla and stir until incorporated, then add the flour and gently stir just until no traces of flour remain. You can also mix the dough with a stand or hand mixer, keeping the beaters on the lowest speed at each step to avoid adding too much air to the dough.
3. Shape the dough into a 1/2-inch-thick square, wrap tightly in plastic wrap and refrigerate until just firm, about 30 minutes. (For slice-and-bake cookies, see tip.)
4. Cut the dough in half and set half on a lightly floured sheet of parchment paper; refrigerate the other half. Roll with a lightly floured rolling pin to 1/8- to 1/4-inch thickness, slide onto a baking sheet and cover with plastic wrap or another sheet of parchment. Repeat the rolling with the second half of the dough and then, on its parchment, stack it on top of the first. Cover with plastic wrap or parchment paper and refrigerate until the dough is very firm, at least 1 hour and up to 2 days.
5. When ready to bake, heat the oven to 350 degrees with a rack in the centre. Line a baking sheet with parchment paper.
6. Peel the parchment or plastic wrap off both sides of the dough and set the dough back on the parchment. This will help the cut shapes come off the paper more easily.
7. Using a floured cookie cutter, cut out shapes as close as possible to one another, transferring each shape to the prepared baking sheet as it’s cut and spacing the shapes an inch apart. Repeat with the other half of the dough, then gather all the scraps, roll them flat and cut out shapes. Refrigerate the dough if it gets soft as you work.
8. Bake one sheet at a time until the cookies are golden brown around the edges, 10 to 13 minutes, or, for a toastier depth, deeply browned, 13 to 15 minutes. Cool completely on the sheets on wire racks. The shortbread can be stored in an airtight container for up to 1 week.
9. Make the icing: Combine the powdered sugar and salt in a medium bowl. Add 2 tablespoons of lemon juice and stir well. The icing should stay opaque but run slowly off a spoon when lifted. If needed, add more lemon juice a bit at a time. If desired, tint the icing different colours.
10. Transfer the icing to a piping bag or small resealable plastic bag. Snip a small hole in the tip of one corner and squeeze the icing over the cookies to decorate. Let it stand until set. Iced cookies can be stored in an airtight container for up to 1 week.

TIP: For slice-and-bake cookies, shape the dough into a 1-inch-thick rectangular block or 2-inch-diameter log. Wrap tightly and refrigerate until very firm, at least 4 hours and up to 2 days. When ready to bake, use a bench scraper or sharp knife to trim the ends, then cut the block or log into 1/3-inch-thick dominoes or rounds. Space 2 inches apart on the prepared baking sheets and bake until golden brown around the edges, 15 to 17 minutes.
-New York Times
Food Stylist: Samantha Seneviratne. Pictures – Julia Gartland/The New York Times
Comments are closed, but trackbacks and pingbacks are open.